banner
Home

Blog

Blog

  • Is there a difference between TAE and TBE buffers for agarose gel electrophoresis? Jan 16, 2025
    Agarose gel electrophoresis is a conventional method for separating and identifying nucleic acids in molecular biology laboratories. Nucleic acids are amphoteric electrolytes with an isoelectric point of pH 2-2.5. In conventional electrophoresis buffers (pH about 8.5), nucleic acid molecules are negatively charged. The charge moves towards the positive pole in the electric field. Through electrophoresis technology, RNA molecules of different sizes and conformations can be separated, and by observing the number, size and shape of the bands, the integrity of the RNA molecules can be judged. In this process, the main function of the electrophoresis buffer is to maintain the pH and make the solution have a certain conductivity. TAE (Tris-acetic acid buffer) and TBE (TRIS-boric acid electrophoresis buffer) are commonly used buffers. What is the difference between them? TAE (Tris-acetate buffer) Advantage: ① For DNA fragments larger than 13kb, TAE buffer can achieve better separation results. ② In TAE buffer, the supercoiled state of DNA can better maintain its true relative molecular mass during electrophoresis. ③Suitable for recovering DNA fragments and subsequent enzyme digestion reactions, etc. shortcoming:   The buffer capacity is small, and TAE buffer may gradually lose its pH buffering capacity during long-term electrophoresis, resulting in changes in pH value. TBE (TRIS-boric acid electrophoresis buffer) Advantage: ① The buffering capacity is relatively stronger, the pH value can be kept constant even during long-term electrophoresis, and it is not easy to cause overheating in the electrophoresis tank. ② Suitable for electrophoretic separation of smaller fragments, such as fragments less than 1kb. Its high resolution makes it easier to distinguish molecules of different sizes, thereby increasing the accuracy of experiments. shortcoming: The boric acid component contained may affect the recovery efficiency of RNA and DNA and subsequent enzymatic reaction experiments.    
  • Cell culture: Uncovering the secret laboratory technology of life Jan 16, 2025
    Hey, friends! Today I’m going to take you into a super cool field – cell culture! Cell culture is actually a technology that artificially controls the cell growth environment in the laboratory. Simply put, it is to create an ideal living environment for cells, allowing them to grow, divide and spread freely. Imagine that this is like building a small "home" for the cells, allowing them to express their abilities and potential here! Cell culture applications are literally everywhere! In biomedicine, cell culture helps us study the mysteries of disease, screen new drugs, and evaluate drug efficacy. Did you know? These little cell culture "helpers" have brought many anti-cancer drugs, vaccines and other medical advances to mankind! Not only that, in the field of biotechnology, cell culture is also indispensable. Scientists can use cell culture technology to produce important proteins, hormones and enzymes, and even perform genetic engineering and biosynthesis. These technologies not only have great potential in the medical field, but also play an important role in the research and development of many areas of high social concern, such as biofuels and renewable energy. ?? Of course, cell culture is a complex and sophisticated technology that requires specialized operations and deep expertise. Scientists must not only select suitable cell lines, but also provide appropriate culture media and growth conditions, and monitor and control the growth status of the cells. Here are some basic steps and key points for cell culture: Select cells: First, you need to select the cell type you want to culture. Depending on the purpose and needs of the research, different types of cells can be selected, such as tumor cells, primary cells, or cell lines transfected with specific genes. Prepare culture medium: Make culture medium appropriate for the cell type of choice. Culture medium is a liquid solution containing nutrients, growth factors, and supplements that provide the nutrients and environmental conditions needed for cell culture. Cell dissociation and passaging: Dissociate cultured cells from culture vessels (such as Petri dishes or flasks) and redisperse them into new culture vessels. This process, called cell passaging, keeps cells growing and multiplying. Control culture conditions: Control culture conditions, including temperature, humidity, CO2 concentration and pH value of the culture medium. These conditions help provide a suitable cellular environment and promote healthy cell growth. Contamination control: Sterile conditions must be maintained during cell culture to prevent contamination by bacteria, fungi and other cells. Adopting strict handling and sterilization procedures is key to ensuring culture purity. Observation and experimental operations: Regularly observe the morphology, growth and cell density of cultured cells. According to specific experimental needs, cell processing, drug treatment, gene transfection and other operations are performed. Cell culture is not only a technology, but also an art. Every successful cultivation is a reverence for life and the pursuit of science. I hope this article gives you a deeper understanding of cell culture! ??  
  • Western Blot Protocol Jan 13, 2025
    1. Extraction of total tissue protein: 
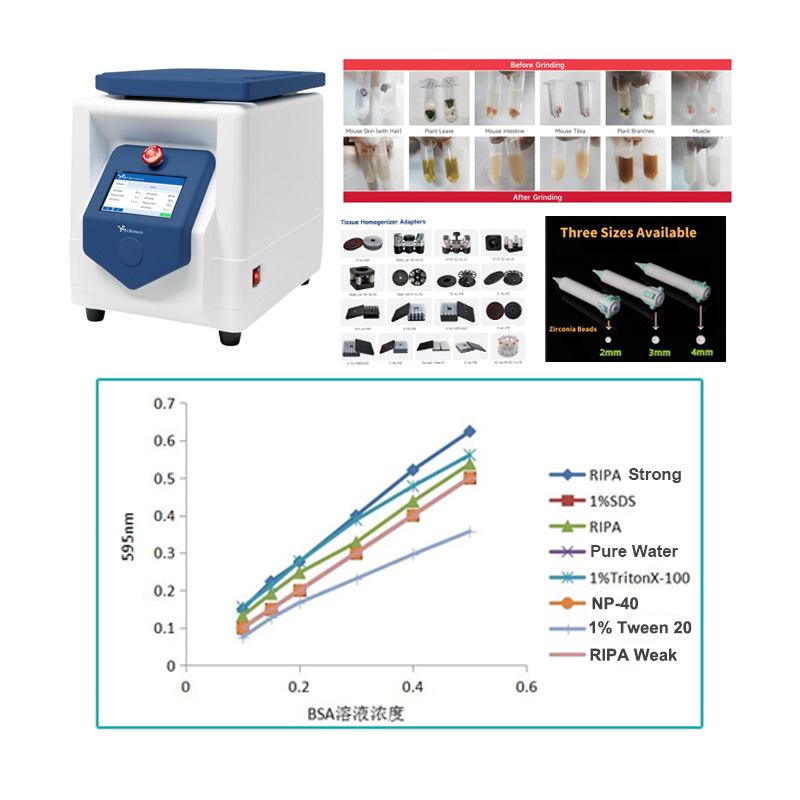
2.1 Wash the tissue 1-2 times with pre-cooled PBS, cut into small pieces and place in a grinding tube, add 3pcs, 3mm grinding beads, and add 10 times the tissue volume of lysis solution (for example: 100mg of tissue, add 1000ul of lysis solution liquid), set the grinding program for tissue grinding; 2.2 Take out the grinding tube after grinding and place it on ice or in fourth-degree lysis solution for 30 minutes; 2.3 Centrifuge at 12000 rpm, 4°C for 10 minutes, collect the supernatant, which is the total protein solution. 
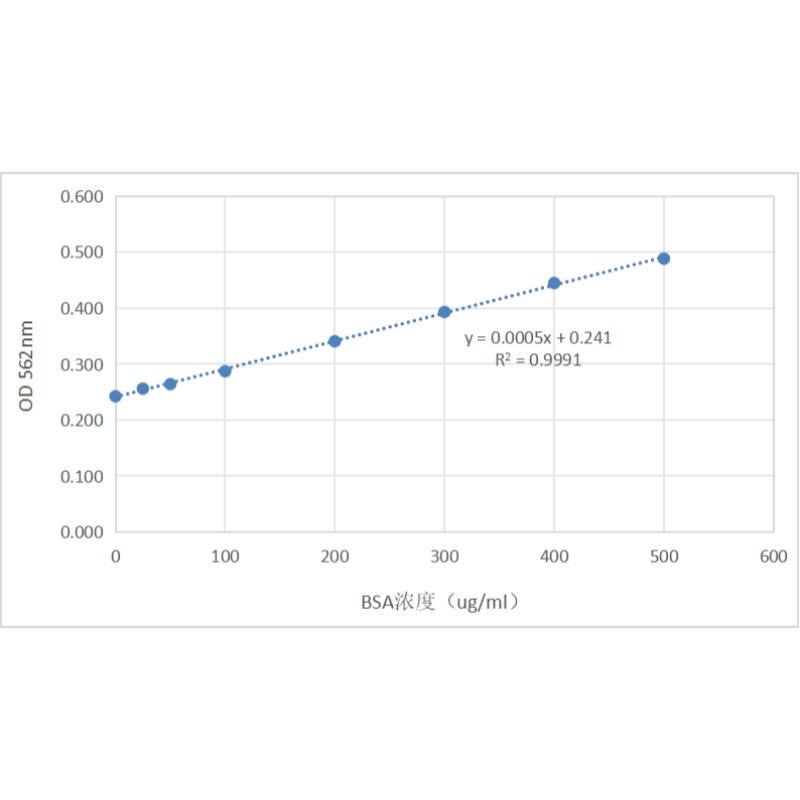
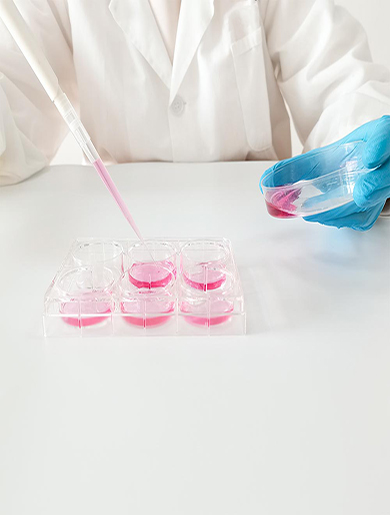
2. Protein concentration determination (optional): Determine the protein concentration as needed, take the undenatured protein solution, and use the BCA protein concentration determination kit to measure the protein concentration. For specific methods, refer to the kit instructions; 3. Protein denaturation:Add 5* reduced protein loading buffer to the protein solution at a ratio of 4:1, denature it in a metal bath at 95°C for 10 minutes, and store it in a -20°C or -80° refrigerator for later use;
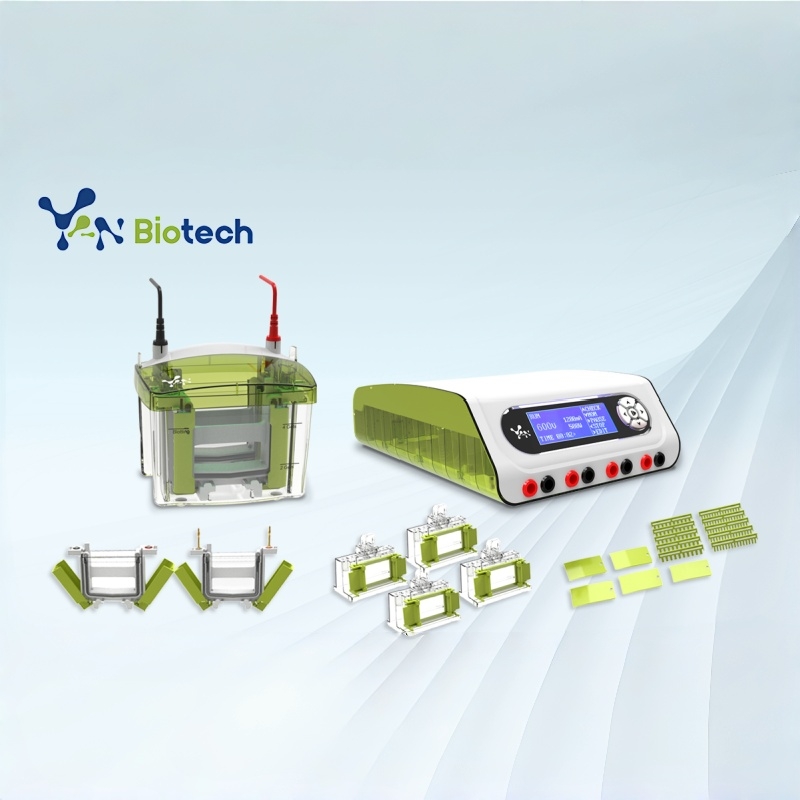
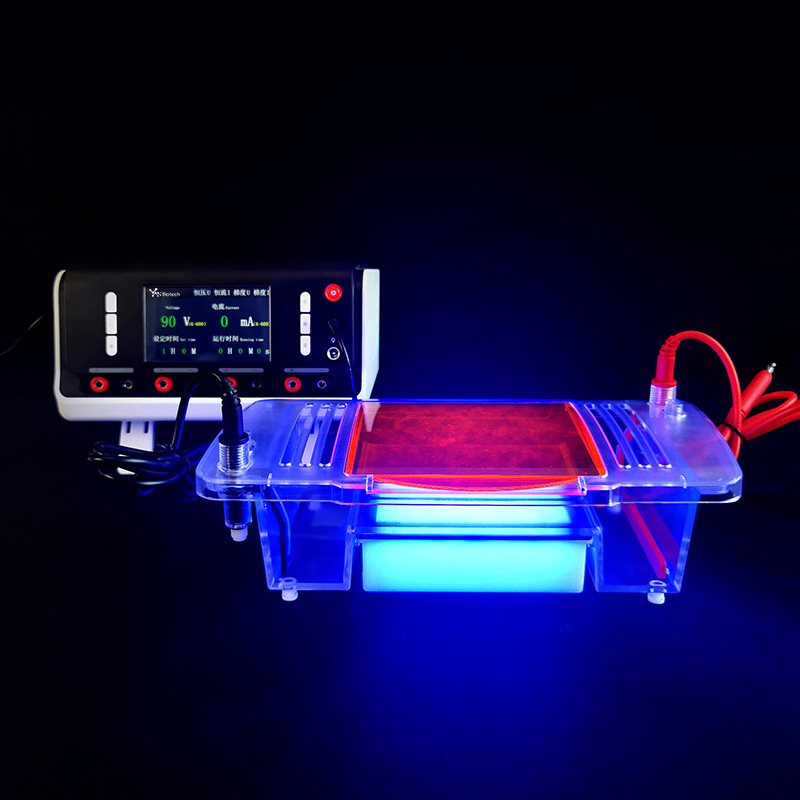
 4. Electrophoresis 4.1 Clean the glass plate; 
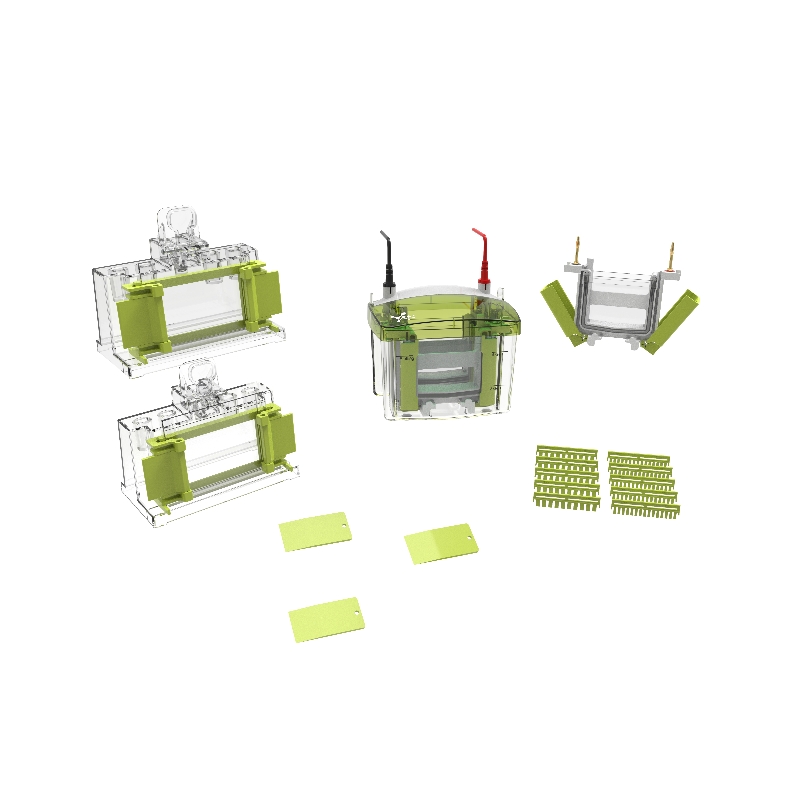
4.2 Gel preparation and sample loading; 4.2.1 ①. First, move the clamping plates on both sides to the bottom, completely open the glands on both sides, insert the concave glass and flat glass from the top diagonally and place them to the bottom. The upper part of the glass is stuck in the slots on both sides; ②. Turn up the glands on both sides, pinch the left part of the gland with your hands at the same time, pull the left clamping plate upward, and lock it to the top; then pinch the right side of the gland at the same time, pull the right clamping plate upward, and lock it. to the highest; ③. After confirming that the electrophoresis glass is clamped and aligned, unscrew the knobs on both sides of the gel making base, then place the electrophoresis bracket into the middle of the gel making base and clamp it, then press the main body bracket with your hands and tighten the knobs on both sides until Rotate to the limit. 4.2.2 Select gel making kits of different concentrations according to experimental requirements, mix solutions A and B in equal proportions, and prepare lower gel solution and upper gel solution respectively. For glass plates of different specifications and thicknesses, the volumes of the upper glue and lower glue solutions can be adjusted in equal proportions. Taking the commonly used 8.3 cm × 7.3 cm gel plate (single piece) as an example, the recommended preparation system is as follows:; Formulation group Formulation 0.75 mm Glass Plate 1.0 mm Glass Plate 1.5 mm Glass Plate Lower glue solution 10% Lower glue solution A 2 mL 2.5 mL 4 mL 10% Lower glue solution B 2 mL 2.5 mL 4 mL AP 24 μL 30 μL 48 μL Upper glue solution Upper glue solution A 1 mL 1 mL 1.5 mL Upper glue solution B(Red Color) 1 mL 1 mL 1.5 mL AP 12 μL 12 μL 18 μL 4.2.3 After assembling the glue maker, first add the prepared lower glue solution, and then use pure water or ethanol to seal the lower glue surface. After the lower glue has fully solidified (about 10-15 minutes), discard the water or ethanol, and use filter paper to absorb the remaining liquid, then add the prepared upper glue solution, insert the comb, and wait for it to solidify (about 10-15 minutes) before use; 4.2.4 Remove the main body of the gel maker, carefully pull out the comb, and prepare to start electrophoresis; 5. After placing the main body of the gel maker into the electrophoresis tank, fill the inside with electrophoresis buffer and add 1/3 with the outside. Use a constant voltage of 200V for 30 minutes until the bromophenol blue is approximately 1cm away from the bottom. The electrophoresis is terminated and the electrophoresis is ready for transfer. 6. Transfer film 6.1 Prepare 6 pieces of 7×9cm transfer filter paper (thin) and 5×8cm PVDF membrane. The PVDF membrane must be activated with ethanol for 2 minutes before use; 6.2 Put the transfer clip, two sponges, filter paper and activated PVDF membrane in the container with transfer solution; 6.3 Spread the transfer folder, with red on the left and black on the right. Add a sponge and three pieces of filter paper to each side; 6.4 Carefully peel off the separation glue and place it on the filter paper (the glue is placed on the side of the black transfer clip). Use the transfer liquid to rinse the bubbles on the glue. Slowly stick the PVDF film to the glue. Be careful not to have any bubbles. Then stick the transfer film in turn. Membrane filter paper, transfer sponge; 6.5 Transfer conditions (wet transfer): Constant current, 300mA for half an hour. 7. Immune response 7.1 Place the transferred membrane into an incubation box containing TBST, rinse it quickly, then add 5ml of 5% skimmed milk, place it on a decolorizing shaker, and block at room temperature for 30 minutes; 7.2 According to the antibody instructions, dilute the primary antibody. After configuration, pour out the blocking solution in the incubation box, add the prepared primary antibody, and incubate at 4°C on a shaker overnight (shake the shaker slowly); 7.3 Recover the primary antibody, rinse the membrane quickly with TBST three times, then add TBST, place it on a destaining shaker for rapid elution, wash three times for 5 minutes each time; 7.4 Dilute the secondary antibody with TBST at a ratio of 1:5000, then add it to the incubation box, place it on a shaker and shake slowly, and incubate at room temperature for 30 minutes; 7.5 Rinse the membrane quickly with TBST three times, then add TBST, place it on a destaining shaker for rapid elution, wash three times for 5 minutes each time. 8. ChemiluminescenceMix ECL A and B solutions in a ratio of 1:1 and set aside. Take out the eluted PVDF membrane and place it on absorbent paper. Slightly absorb the liquid on the membrane and put the membrane into the mixed ECL. In the luminescent liquid, let the liquid completely immerse the membrane. After the reaction for 1 minute, take out the membrane and place it on the chemiluminescence instrument tray. Start chemiluminescence according to the preset program. After the exposure is completed, save the original image in TIFF format. 
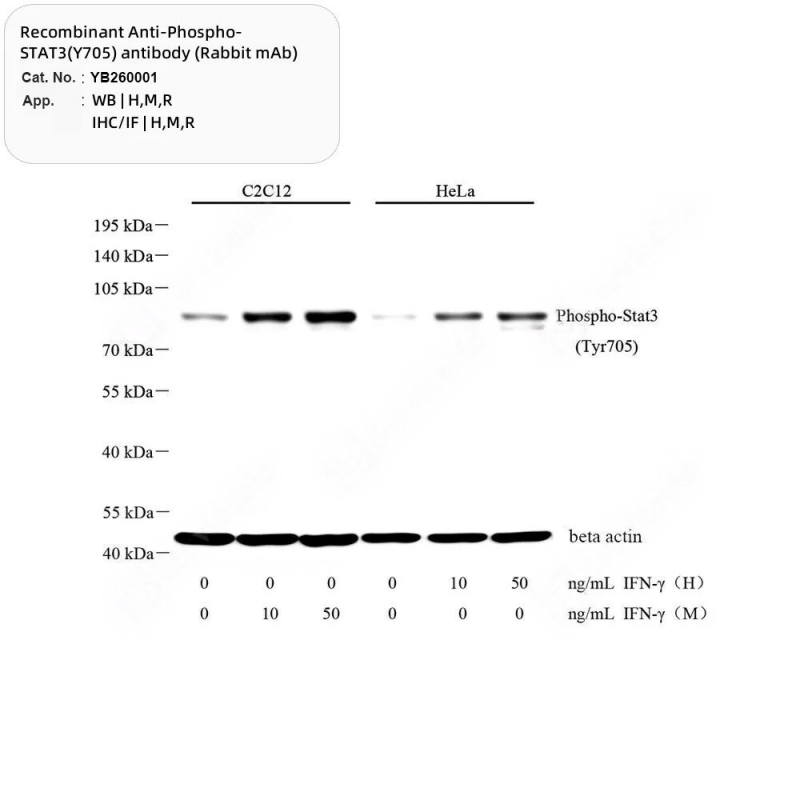
9. WB results and analysis 
  • How to Choose A Suitable Pipette? Jan 13, 2025
    Colleagues who sell pipettes often receive inquiries from recommended customers, "Can you give me a set of pipettes? They can be used in all measuring ranges, like a set of four." At the request of customers, pipettes with four measuring ranges of 0.5-10uL, 5-50uL, 10-100uL, and 100-1000uL are generally recommended to customers. On the surface, it seems that what the customer buys covers almost the full range of micropipetting, and it seems that everything is done perfectly, but this is not the case! After many years of pipette after-sales work, we have collected feedback from customers on problems such as inaccurate pipetting and difficulty in use, which often stem from the initial set selection.Let's take the most common example: Customers often give the most feedback in pipetting when using a 10uL pipette to transfer liquids within 1uL. Theoretically speaking, a pipette with a measuring range of 0.5-10uL has no problem when operating liquids within 0.5-1uL. Why do customers often report the most problems at this measurement range? Below 1uL is an ultra-micro liquid operation. The amount of liquid is almost invisible to the naked eye. The basic skills of liquid operation are very high, such as: rinsing, insertion depth and other technical details.For example: technical details such as rinsing, insertion liquid level depth, etc. In addition, the quality of the suction head also has a great impact on this micro-volume operation. Some suction tips of poor quality will have residual plastic burrs on the tip end of the suction head. Such poor quality tips have almost fatal effects on micropipetting. When using tips of normal quality, most operators choose to use pipettes with a range of 0.1-2uL. For liquid transfer operations below 1uL, the pipetting effect is significantly better than pipettes with a range of 0.5-10uL. Below we take the Yanbio pipette as an example to illustrate:The general range of ordinary precision adjustable pipettes is between 0.1uL and 10mL. The different ranges are shown in the table below: Item Name Cat.No. Nominal Volume Volume Range Increment Single Channel Pipette YB-P2.5 2.5 μL 0.1-2.5 μL 0.05 μL YB-P10 10 μL 1-10 μL 0.1 μL YB-P20 20 μL 2-20 μL 0.1 μL YB-P100 100 μL 10-100 μL 1 μL YB-P200 200 μL 20-200 μL 1 μL YB-P1000 1000 μL 100-1000 μL 5 μL YB-P5000 5000 μL 1000-5000 μL 50 μL YB-P10000 10 mL 1-10 mL 100 μL 8-Channel Pipette YB-PM10 10 μL 1-10 μL 0.1 μL YB-PM100 100 μL 10-100 μL 1 μL YB-PM300 300 μL 50-300 μL 1 μL YB-PM1000 1000 μL 100-1000 μL 5 μL   Different models of pipettes have different ranges. When we choose a pipette, a certain range will often appear, and several pipettes of different models can suffice. How to choose the pipette with the most suitable volume. Example: A pipette is required, and the volume often pipetted is 20uL. We have four different types of 2-20uL (model YB-P20) / 5-50uL (model YB-P50) / 10-100uL (model YB-P100) / 20-200uL (model YB-P200) Liquid dispensers are available. Which pipette has the smallest error at 20uL? According to our daily routine of selecting products, we believe that it would be most appropriate if the target volume is in the middle range, and we will empirically choose 5-50uL (model YB-P50). Is this the case? Let's take a look at the data results:Let's use these four types of pipettes to do an error analysis: Cat. No.: Volume Error at 20uL YB-P20 20-20uL ±0.2uL YB-P50 5-50uL ±0.5uL YB-P100 10-100uL ±0.6uL YB-P200 20-200uL ±1.0uL It can be seen that the 2-20uL pipette is the most suitable in terms of accuracy and precision, and the target volume of 20uL is the most suitable.          
Contact Us
Address : Building 3, Guang Gu Wu Lian Gang, No. 29, Daxueyuan Road, Guandong Street, Donghu New Technology Development Zone, Wuhan City, Hubei Province
Newsletter
Please read on, stay posted, subscribe, and we welcome you to tell us what you think.
Submit

Copyright @ Wuhan Yanbiotech Co., Ltd. All Rights Reserved. Network Supported Xml / Privacy Policy

Leave A Message

Leave A Message
If you are interested in our products and want to know more details,please leave a message here,we will reply you as soon as we can.
Submit

Home

Products

whatsApp

contact